Every professional photographer MUST not only create a solid digital marketing plan but also reserve a budget for running Facebook Ads to get new clients.
In the previous article, we covered the issue of running Facebook Ads, and now you’ll learn how to get them to the next level – using Facebook Pixel. I’ve created a step-by-step solution on how to install Facebook Pixel on your website, how to target people who’ve already visited your page, and how to create a new target group based on your visitors. Ready?
Create and implement Facebook Pixel on your Photography website
In this part, we’re gonna create our own Facebook Pixel.
If you already have one that is properly implemented on your photography website, you can skip this chapter and go straight to the next one.
Go to the Business Manager and click „Business Settings” section. Now, you can search for „Pixels” within the „Data Sources” and click „+ Add” button.
Here you can put a name for your Pixel, and in most cases, you’ll probably only own one, so you can simply use the name of your Photography business, i.e., „John Doe Photography”. In the second field, put your website’s address. We can then click the „Continue” button and then use the „Set up the Pixel Now” section.
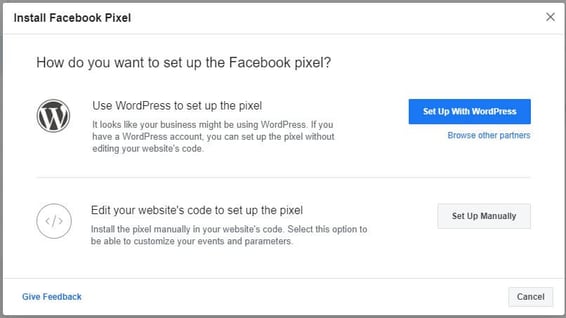
Each user may see different buttons here (it depends on the language/geographical location, etc.). In my case, the system asks me to choose between two options:
- „Set Up with WordPress”
- „Set Up Manually”
Facebook Business Manager
If your photography website is based on WordPress CMS, it is much easier to use the first method, but in any other case, you should choose „Set up Manually” (but it’s not that hard, I promise!).
Facebook Business Manager
Let’s use the second method and see what to do now. Facebook has generated a unique code that you need to implement on your website (in this way, the system will connect FB users with your website sessions). All you need to do is to click „Copy Code”, go to your website’s admin panel, and edit your source code.
Facebook Business Manager
It’s time to search for „</head>” and paste this code right above that. Now you can click „Save” and go back to Facebook, where you can click „Continue” and verify whether it’s properly working.
If your website is built in a different way and it’s impossible to access your source code easily, you can visit Jon Loomer’s blog post that describes three other ways to add it.
So, if the Pixel is properly added to your website, you can go back to Facebook and put your URL address into the „Test the base code” section. Then you can click „Send Test Traffic”, and the system will tell you that (hopefully!) the code is visible.
Congratulations!
Now, it’s time to see all the possibilities of this solution.
How to use Facebook Pixel for your photography business?
As a photographer, there are three vital functions of Facebook Pixel now at your disposal:
a. Leads Tracking
b. Remarketing
c. Lookalike Audiences
The first one - Leads Tracking - will tell you where your ad bookings are from. It’s very similar to Goal tracking in Google Analytics, but the difference is that by using Facebook Pixel, you can track particular campaigns, ad groups, and ads within Business Manager.
Long story short – you’ll be able to see which ad performs the best, what are your costs per lead, and most importantly – which ad groups are getting the job done.
Most of us probably know what the term remarketing is, and I’m sure that all of us have been ‘touched’ with remarketing campaigns in the past. Whenever you’re visiting e-commerce and click on particular products, later, you see Facebook/Google Ads that remind you about these items. That’s what remarketing is, and most importantly – IT WORKS!
…and why does it work?
It works because you’re reaching users who've already been introduced to your brand. In addition to this, you can target people who did some specific action on your website (i.e., spend at least 30 seconds, visit three sub-pages, etc.). What’s more, you can deselect a group who has filled out a form on your website, so you can be sure that you will not reach couples you’ve already booked.
A Lookalike Audience is tightly connected with your remarketing users. Facebook Ads is such a complete system that it not only verifies people who’ve entered your website but also looks for people who are similar (but NEW) to them. It’s mainly based on the usage of the platform, websites, age, etc., and it’s highly cost-effective.
It’s really useful to create a Lookalike Audience even after the first week/month after Facebook Pixel implementation because this group can be created even from a small number of users (at least 100 people).
*Pro Tip:
You can also create a Lookalike Audience from people who have interacted with your Facebook/Instagram fan page (it can be another ad group for tests).
Track your inquiries with Facebook Pixel
The first thing you need to do in order to track your inquiries is to fill out the booking form on your website. When you do that, copy the URL link that will appear in your browser and save it in the notepad (for example your-photography-page.com/thank-you-form)
Now, you can go to your Facebook Business Manager and Click:
Business Tools › Events Manager › Custom Conversions

Facebook Business Manager
This is also the place where you’ll be able to see the actual number of inquiries made via the form on your website (right column „Total Received”).
…but in order to see them, you need to click the blue button „Create Custom Conversion”.
Fill out the form according to the pattern suggested below, and confirm it by clicking „Create”.
Name: Form Submission
Data Source: choose your Facebook Pixel name
Conversion Event: All URL Traffic
Choose a Standard Event for Optimization: Lead
Rules: paste the URL that you previously saved in your notepad (i.e., your-photography-page.com/thank-you-form)
Facebook Business Manager
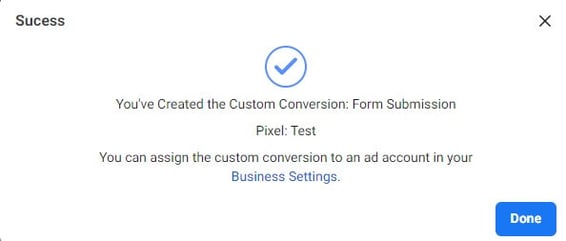
In most cases, the configuration of Custom Conversion is finished (and you should see the notification about that). However, if you manage more than one account, you can be asked to go to Business Settings and assign the custom conversion to the specific Ad Account.
Facebook Business Manager
CONGRATULATIONS! Custom Conversion is set up, and you can track your inquiries. Here are two ways how to do that:
1. Global perspective – total number of form submissions (visible here: https://business.facebook.com/events_manager2/custom_conversions/ )
2. Facebook Ads – number of form submissions coming from specific Ads. In order to see them, go to your Ads Manager and click:
Columns › Customize Columns

Facebook Business Manager
Here you have to search for the Custom Conversion that you’ve just created. The quickest method will be to type „Form Submission” in the „Search” section, tick sections „Total” and „Cost”, and click „Apply”.

Facebook Business Manager
Now you can select the date range, and you can see the exact number of bookings from a particular Campaign, Ad Set, or a specific Ad. From this perspective, Facebook will automatically measure Cost Per Form Submission so you’ll be able to see which ad performs the best.
Facebook Business Manager
Use a Remarketing campaign to target your future Customers
We all like something familiar and something we know, so it may come as no surprise that it is much easier to get new bookings from people who've already visited your website. That’s why you should always plan a budget for your remarketing campaigns.
…but how to actually create such campaigns? Let’s dig into Facebook Ads!
First, you need to go to your Business Manager and go to the „Audiences” section.
Facebook Business Manager
Click on the following buttons:
„Create Audience” › „Custom Audience” › „Website”
We’ll start by creating a group of people who have already used your booking form (in order to exclude them from future campaigns).
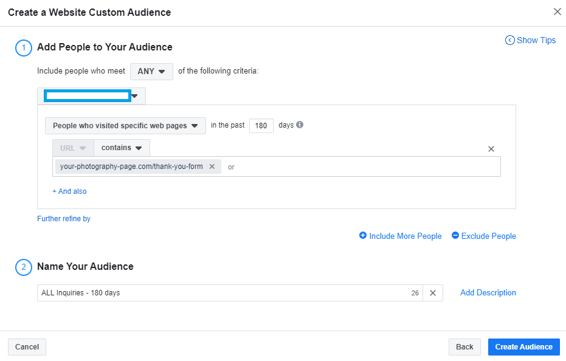
In the first section (Add People to Your Audience), click on the button „All website visitors” and change it to: „People who visited specific web pages”, and type the number 180 (days) in the next bracket.
When you do this, an additional bracket will appear where you have to add a „thank-you page” (which you used for creating a Custom Conversion), for example, your-photography-page.com/thank-you-form.
Now, you can name your audience, and the whole form should look like the example below:
Facebook Business Manager
After clicking the „Create Audience” button click „Done”.
Now, we’ll create a proper remarketing group that you should reach with your Ads.
So, let’s (once again) click:
Create Audience › Custom Audience › Website.
Here you should think about your website visitors and your potential strategy.
a. If you don’t have many website visitors...
select „All website visitors” in the past 20 days.
In this way, you’ll reach all people who’ve entered your website in the last 20 days (you can type here a different number of days, but if it’s too far, people might not remember your website). You have to be aware of the fact that this can contain traffic from all your subpages (including the customer area for your clients). Then you can name your audience (for example: „All visitors – 20 days”) and click „Create Audience”
b. If you have many website visitors…
you can divide the traffic into people who’ve visited specific subpages (for example, your portfolio URL, blog post, contact subpage, etc.) by clicking on „All website visitors” and changing it to „People who visited specific web pages” in the last 20 days.
Below you can put the URL address to the specific subpage that you want to gather people from (for example, your-photography-page.com/contact). If you want to go a step further, you can also click on the choose „Visitors by time spent” and choose the group of users divided according to the percentile of time spent.
When you finish selecting sources, you can go to the section „Name Your Audience” and describe your audience (for example: „Contact visitors – 20 days”), and finish by clicking - „Create Audience”.
Let’s run ads targeted at our website users!
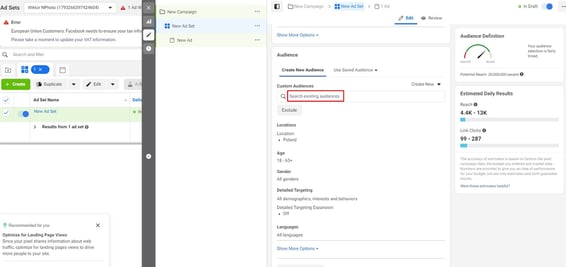
Go to the Ads Manager, click the „+Create” button, and follow the steps of Campaign configuration (for remarketing campaigns, I suggest using Traffic or Engagement). When you reach the „Ad Set” stage, scroll to the Audience section, and click on the „Search existing audiences” space:
Facebook Business Manager
When you click on it, search for the audience that you previously created and click on it. If you want to skip over people who’ve filled the form on your website, use the button „Exclude” and choose the proper source (in my case: „ALL Inquiries – 180 days”).
It’s also crucial to put a proper location of your group, so scroll down a little bit, click on the „Edit” button when you point at the „Location” section, and edit it according to your working area (the same thing should be done with Age).
If you're 100% focused on wedding photoshoots, you can also narrow this group and click on the Detailed Targeting section, where you can type such characteristics as „Engaged”, „In a relationship”, „Newly-engaged”, but in this case, you can omit people who are not updating their relationship status on Facebook (so for the start, I’d recommend not to do it).
Targeting your website visitors is set up – now it’s your turn to think of some clever ads! You can go to this article in order to update your knowledge about running Facebook Campaigns.
Create a Lookalike audience based on users of your website
Facebook knows A LOT about us – this is both a good thing and a bad thing. However, let’s put ethics aside for a moment and focus on how to use Mark Zuckerberg's Big Data to our advantage.
Due to the fact that Facebook Pixel is installed on your website, each user is ‘registered’ in the system. In this way, Facebook identifies the variables for the group of people that are visiting your website and can look for people (within Facebook’s database) that are similar to them.
In order to create such a group, go to the Audience section, and click:
Create Audience › Lookalike › Website.
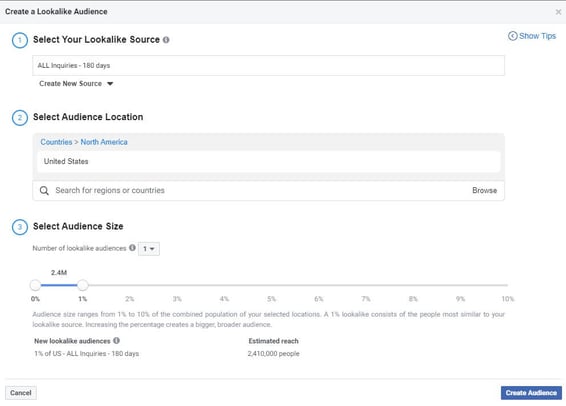
Now, you have to choose the main source from which the Lookalike Audience will be created. Click on „Select an existing audience or data source”, then „Other Sources”, and here you can click on the group that you’ve created during the previous step (when we talked about the remarketing campaign).
In the next section, you will be asked to choose the country (where you want to look for new users) and select the audience size. I recommend selecting the first stage – 1% because this group will consist of the people who are most similar to your users, and then you can click „Create Audience”.
Facebook Business Manager
Right after clicking the blue button, Facebook will inform you that the group is pending but ready to use. Although the system says, so, many Ad experts suggest waiting a day or two before using this group for your ads because it’s not yet fully functional.
When we’re ready to go, you can go to the Ads Manager and create a new campaign. When you reach the Ad Set stage, do a similar thing as we discussed during the previous chapter click on the „Search existing audiences” space, and choose the Lookalike Audience that you’ve created.
What’s extremely crucial is to click on the „Exclude” button and choose the original source of the Lookalike. With this, the system will then exclude from this group the people who have already visited your website and, instead, will only reach new users.
Photographer – your Facebook Pixel is ready!
I hope this guide fulfills your expectations and, most importantly – will get you new bookings. If you have any questions or comments regarding Facebook Pixel, we’re here to help you. Just type your question in the comments section below!
Need more help with digital marketing? Have a look at our guide below, available for free in the form of a PDF, alongside a few other goodies.
