I understand; every time you get a new inquiry for a photo shoot you party like a rock star, right? I mean I would, too and that’s great!
But, right after the celebration, you should actually find out how your potential customer entered your website – whether it was because of social media, an organic search, or some co-operation with a venue. Also key is determining what have they been doing on your website, or, most importantly – what kind of content encouraged them to fill out your contact form?
Within this blog post, we’ll cover each of these aspects using (agruably, the best tool for your website) - Google Analytics. So, grab yourself a cup of coffee, make yourself comfortable, and let’s have some fun!
How to set up Google Analytics account?
Adding Google Analytics is extremely important and should be done right after creating your website.
If you already have a Google Analytics account properly connected to your website, you can skip this paragraph, and go to the next one. If you don’t, then go to the https://analytics.google.com/analytics/web/ and click the blue button “Set up for free”.
Source: https://analytics.google.com/analytics/web/
Now, you can add your account name (for example John Doe). At this stage, it’s not a URL address, so no need to be picky about the name (probably you are the only person who’ll see it :) ).
On the bottom, you will be asked to tick data sharing options – it’s not obligatory, but in some cases, it can be useful (sometimes you will be notified about new features or interesting KPIs [Key Performance Indicators] regarding your website).
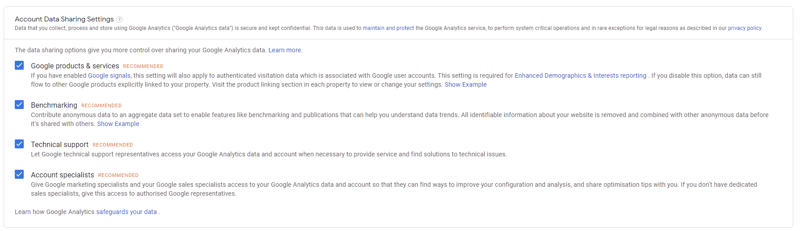
Source: https://analytics.google.com/analytics/web/
I assume that you don’t own your own app, so in the next stage – “What do you want to measure” select “Web”, and click “Next”.
Ok, we are in the most important section, so stay focused.
Fortunately, it’s pretty basic :) Fill the form with your precise data: Website Name (for example John Doe Photography), and the proper Website URL (select here HTTPS or HTTP – it might differ in some cases, so the easiest way to check it is to enter your website in the new tab, copy-paste your URL address and then paste it in the Notepad). Then choose Industry Category (not important at all), and “Reporting Time Zone” (this is highly important, because it will influence the calendar within Google Analytics’ system).

Source: https://analytics.google.com/analytics/web/
Let’s click Create, and accept Terms of Service Agreement.
Hurray!
You have created an account! Now it’s time to connect it with your website.
You should now see “Website Tracking” section which directly describes how you should add a small custom code to your website.
In most cases, website systems are prepared to add a Google Analytics code (for example, there are many plugins for WordPress where you just have to add Google Analytics’ ID).
How to track your inquiries?
Right now your Google Analytics account gathers general information about your users, and that’s really great.
However, now we’ll go to a totally new level with your business – we’re gonna track users who actually filled the form on your website.
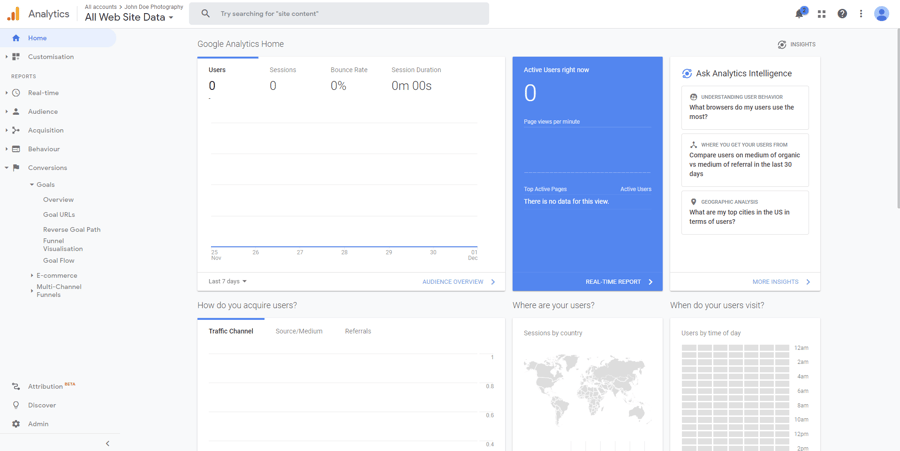
Source: https://analytics.google.com/analytics/web/
With that kind of information, you will know which source actually brings you money – whether it’s traffic from Facebook, Google Search, or Referral etc. et al. Sounds cool? It is!
Ok, so open a new tab and go to your website.
Locate a contact form and fill it out with proper information (it’s always a great feeling to have a new booking, right? ...even if it’s a fake one!), and submit it.
Now your URL address should change – if it does then you are eligible to track your potential customers (if it didn’t, then you’re gonna have to do it in other way, which we’ll cover in the future blog post ;)).
Copy this URL, and let’s enter Google Analytics and click on the “Admin” button.
We’re in the “less” marketing section of this tool, but don’t be scared. In the right column click on the button “Goals”, and then “+NEW GOAL”.
We can choose between “Template” or “Custom” Goal set-up – for some of you this view might differ, but let’s select “Custom”, and click “Continue.”
You can type the name of the Goal, as “INQUIRY” and select the type as a “Destination” (and of course… Continue!).
Do you remember about this URL address that you were supposed to copy?
Now it’s time to paste it.
Do it in the “Destination” section, after selecting the “Equal to” button.
ALAS!
Well, almost, after pasting this URL address be sure to remove the first section with the name of your website – so instead of adding johndoephotography.com/thank-you-inquiry just enter /thank-you-inquiry and click Save.
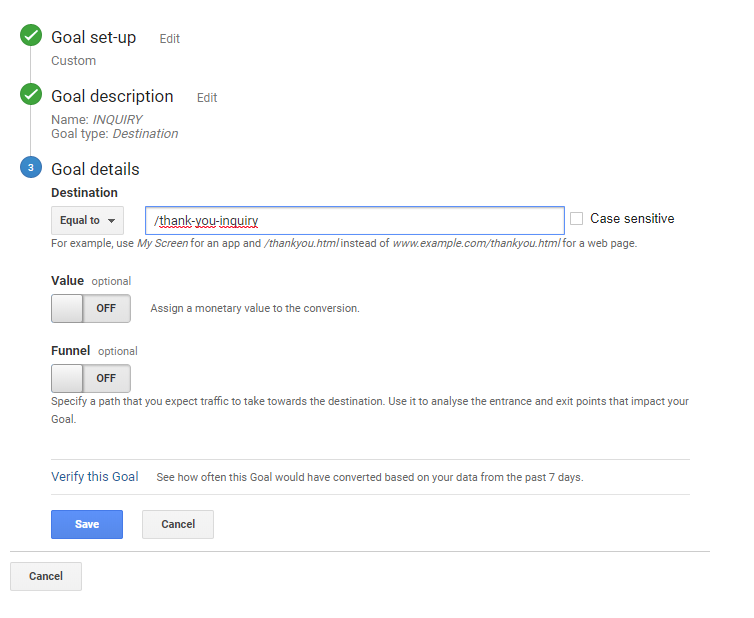
Source: https://analytics.google.com/analytics/web/
CONGRATULATIONS! Now, you’re measuring each booking!
Of course, it’ll work only from that point on, so it’ll be impossible to track leads that you got before adding this feature, but each new inquiry will be properly measured.
How are your potential customers reaching your website?
Ok, so we’ve configured the “Goals” feature; which enables you to enter the world of your customers, but how can we actually use it?
The most useful way will be to see how they entered your website.
In order to see it, go to: “Acquisition” → “All Traffic” → “Channels” and select the Date Range in the top right corner.
Get ready – these ARE the droids that you are looking for!
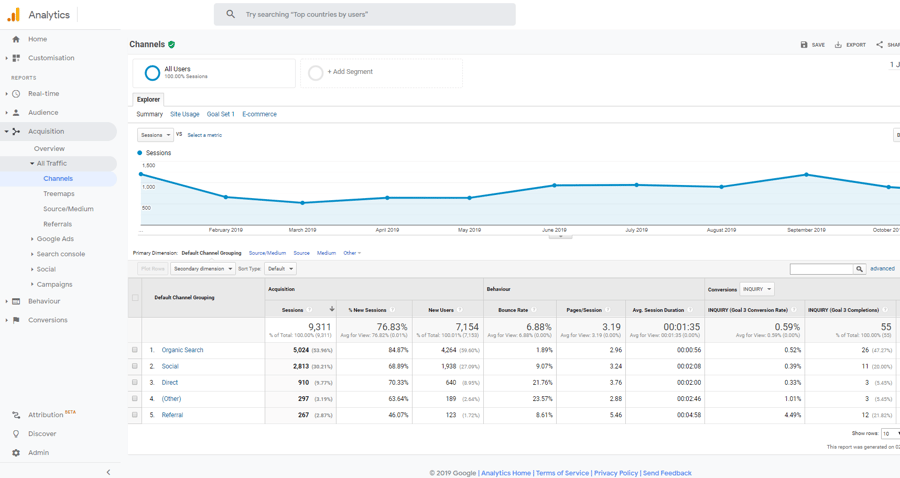
Source: https://analytics.google.com/analytics/web/
In the right column you can select ‘“INQUIRY” Conversion’ and below you can see the number of inquiries from a particular Channel (the column on the left).
On this screenshot (this is a real account) you can see that 26 bookings were made from Organic Search (it's Google in most cases), 12 from Referrals, etc.. If you want to go even deeper you can click on the “Referral” to see from which particular website the potential customer entered.
Below please find a very general definition for every channel:
• Direct (users who’ve typed your URL address)
• Organic Search (any session that is coming through a Search Engine – Google, Bing, etc.)
• Social (Social Media websites – Facebook, Instagram, Linkedin, ….)
• Email (here you can find users who clicked on the link to your website in their mailing system.)
• Referral (users who’ve entered your website by clicking on the link that was used on any other website. You can click on it to see the particular page.)
• Paid Search (traffic from your text campaigns coming from Google Ads.)
• Display (people who’ve clicked on any graphic banners that you used in your Google Display ads.)
• (other) (this is a tricky one! In the case of these sessions Google Analytics is not able to assign them to any of the aforementioned sources)
Which users actually are becoming your customers?
This one is really exciting – especially when you get a lot of inquiries!
Within this feature, you will be able to select only the users who are finishing their session by filling the contact form. So, within the next 5 minutes, you’re gonna have details of your potential customers!
Let’s start with setting it up :)
In the top part of our beloved tool you can see the “Segments” section (although its name does not appear anywhere…).
By default it’s set to “All Users”, and it’s OK for most of your actions within Google Analytics. However, now we want to narrow this traffic only to users who actually did some precise action, so let’s click on the “+Add Segment” button.
Now, you can click the “+ NEW SEGMENT” button, and go to the “Conditions” section on your left.
Here we want to add our one and only condition – people who filled our contact form.
In order to do so, click on the “Ad Content” and type “INQUIRY (Goal 1 Completions)”.
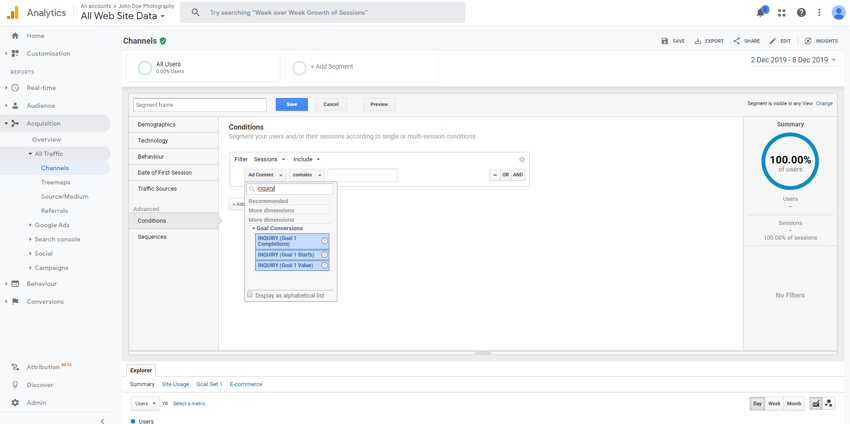
Source: https://analytics.google.com/analytics/web/
It’s almost over!
We’re in the digital world, so we need to think about using IT language.
As you can see this fragment is an equation, that’s why we must end it with number a “1” after the equal sign.
We can save it with adding a name – in my case, it’s “Sessions – INQUIRY”.
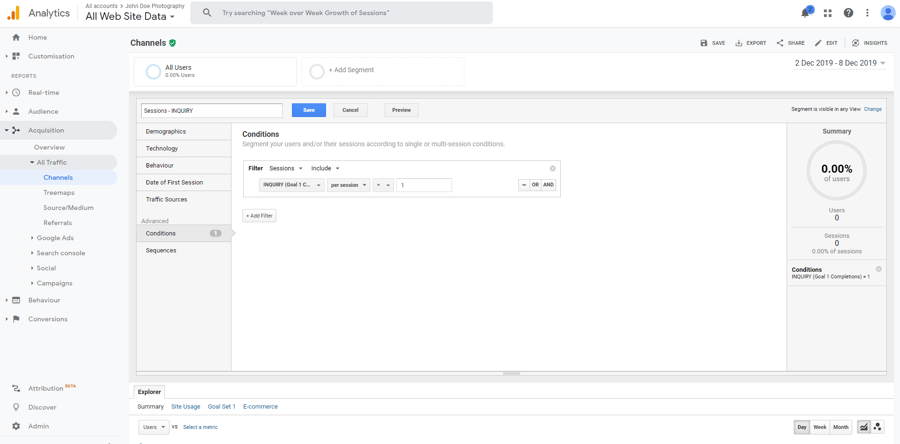
Source: https://analytics.google.com/analytics/web/
Congratulations!
Now the only data you see is coming from people who are your potential customers. So if you go to the Acquisition → All Traffic → Channels you’re going to only see sessions from particular acquisition channels.
...but, the best is yet to come!
Let’s find out who your potential customer is – is it a man, or a woman; what’s their age, their location?
Go to the Audience → Overview on your left. Now you can click on each button – “Country,” “City,” “Browser,” or even “Operating System”.
To go even deeper, click on Demographics → Overview (in some cases you will be asked to click an “Enable” button) where you are able to see the Age and Gender of your potential customers.
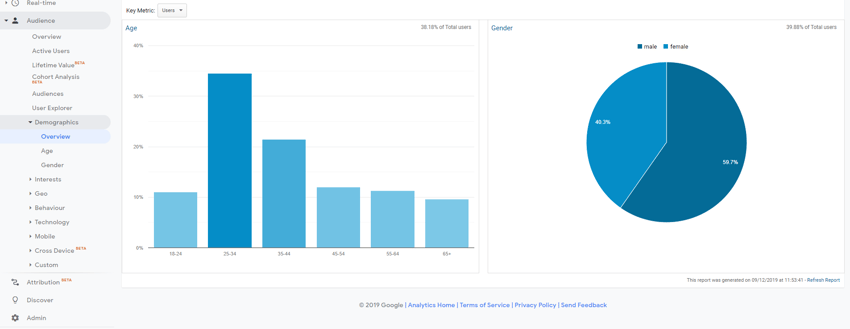
Source: https://analytics.google.com/analytics/web/
Which subpages are really important for your photography business?
In order to see it we need to have all the possible data.
So, let’s de-select our “INQUIRY” segment by clicking on the arrow and then selecting “Remove” (don’t worry – it will not remove it forever!).
Now, we are back to the situation where we see traffic from each particular user - “All Users”.
Now, let’s go to the section: Conversions → Goals → Reverse Goal Path.
You probably have a lot of subpages on your website. They are probably blog posts, a contact page, a biography, etc. Here is a solution where you can actually see which subpage made your users become potential clients.
On the left you’ll see “Goal Completion Location” - in your case it should be “Thank you page”.
In the case of “Goal Previous Step – 1” it’s the place where your contact form is set up (although it may occur in many different subpages I assume that in most cases it’s just one place).
However, the crucial part is “Goal Previous Step – 2” - this is THE subpage that actually made them go to the contact form (Step 3 also might be important :) ).

Source: https://analytics.google.com/analytics/web/
There are many useful and important features in Google Analytics for Photographers, but there is one more we must discuss that is crucial for any professional photography business, and it’s connected with your subpages.
It’s the place where you can see the number of sessions for particular blog posts, contact pages, etc.
To get there, go to Behaviour → Site Content → All Pages.
Select the date range (top-right corner) that you want to analyze and enjoy the numbers!
On the table below you’ll be able to see such things as Page Views, Average Time on Page, and much more.
Google Analytics – the best digital tool for photographers
I honestly think that using Google Analytics is crucial for every photographer to stay on the market (and, especially to dominate the market!).
We all live and operate in a digital world, so in order to understand your business and nurture your business to grow and succeed you have to analyze your digital marketing campaigns and the traffic of your website.
And, the best way to do this is is with Google Analytics – and now know you how!
Let me know what you think about Google Analytics in the comments section below, and feel free to ask questions!
Need some extra help with digital marketing in general? We have a PDF guide dedicated especially to photography available for download, completely free of charge. Check it out below to get some other bonuses too!